Friday, 27 September 2019

How to make Login with Google Account using PHP


Now a days in the world of internet, as we know social media is an very import part of any web based application. So if your web application has provide feature like login with social media, then it will be gaining more new users to your web application. So, in this post we have share tutorial on how to login or sign in or register with Google Account in your PHP web application. Here we will make system in which user can login with their Google account into your website.

For login with Google Account using PHP, Google has provide Google OAuth API, which is very easy and helpful to you for implement login using Google account into your Website. Google Login API has provide rights to user to login into the website by using their Google account credential without register on that particular website. By using this feature, your website will gain more subscriber, this is because in current days most of all users have a Google Account, so they can login with their Google Account without sign in on your website.

In this tutorial, we will use Google OAuth Login API, this API give permission to users to login with their existing Google accounts to your website. Below you can find how to integrate Google Login API in your PHP website and you can also find the process how to get API key and how to integrate Google Client Library in your existing PHP library for Login.


Get Google API Credential


First we need to get Google API keys, for this first you have Google Account. So, login into your Google Account and follow below step.

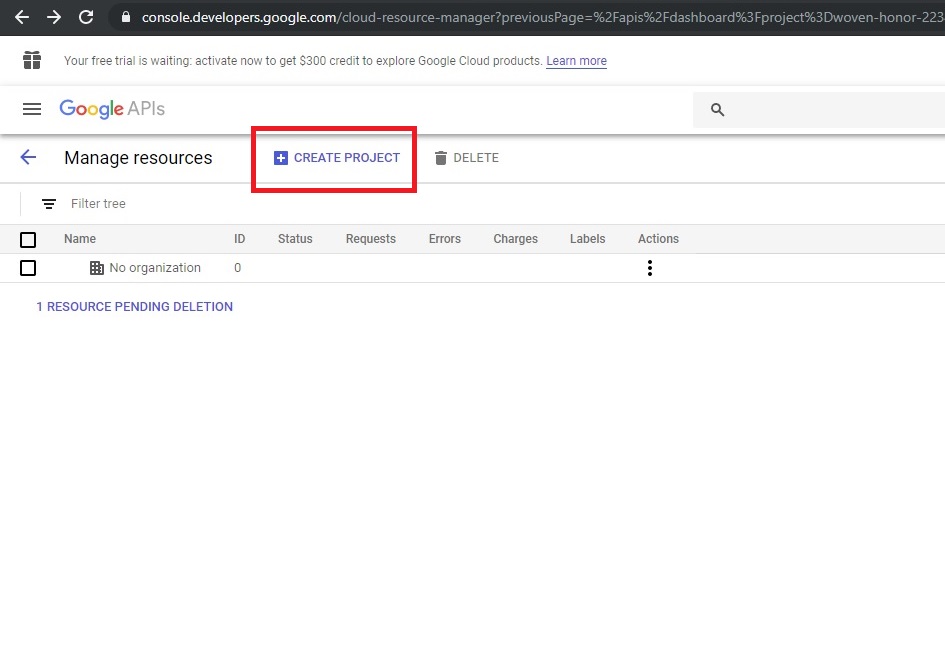
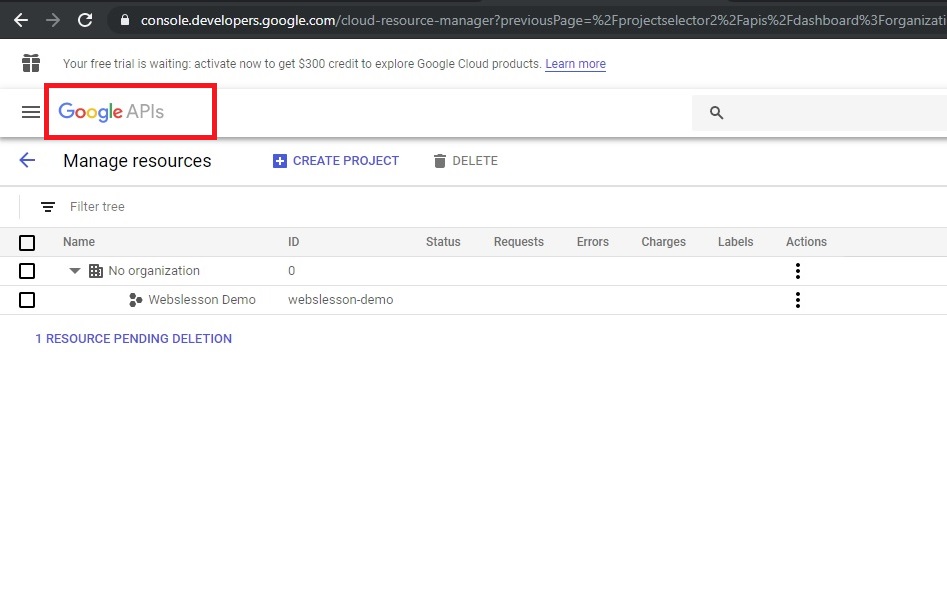
1 - Go to https://console.developers.google.com/ this link.
2 - After this click on Create New Project link for create new project.


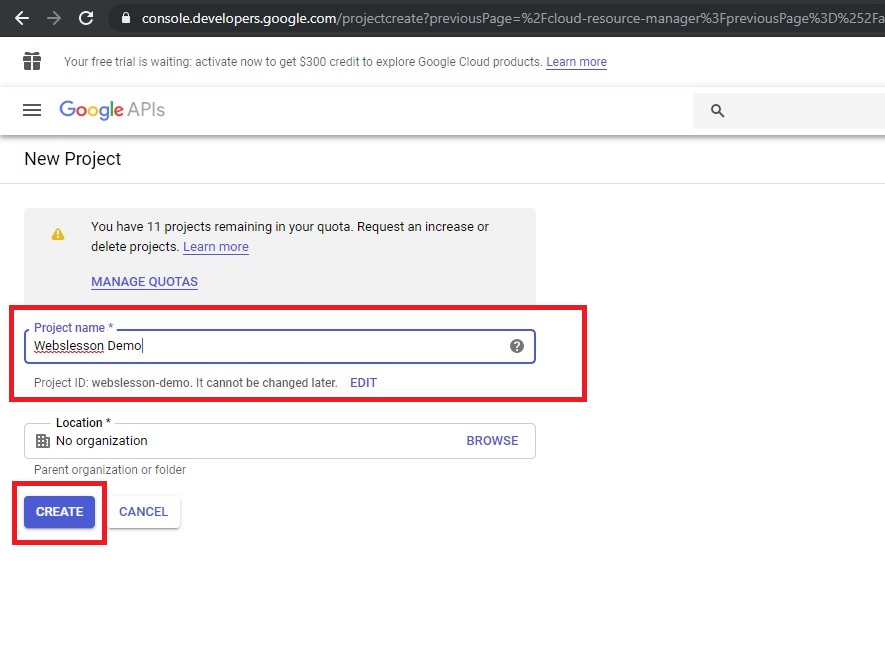
3 - Enter Project Name and click on Create button.

4 - Once you have create new project then you can see your project list on web page.

5 -After this click on Google API logo for go to home page.


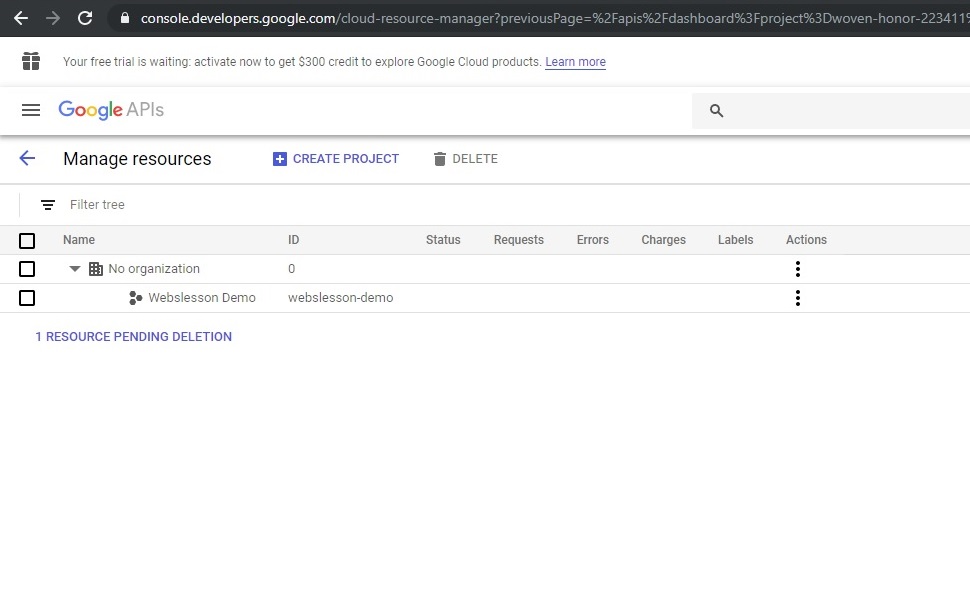
6 - Once you have redirect to home page then select project from the project select box.


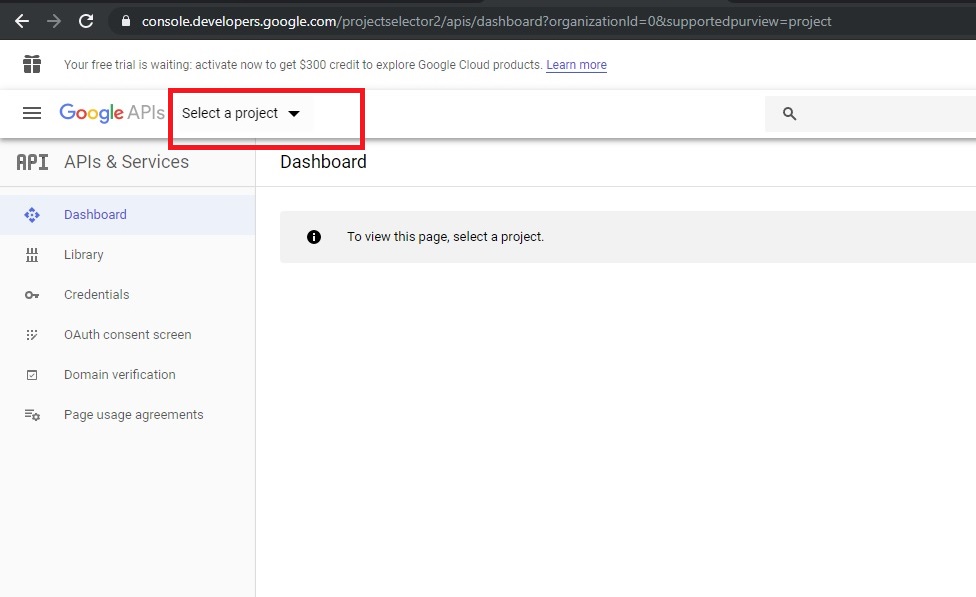
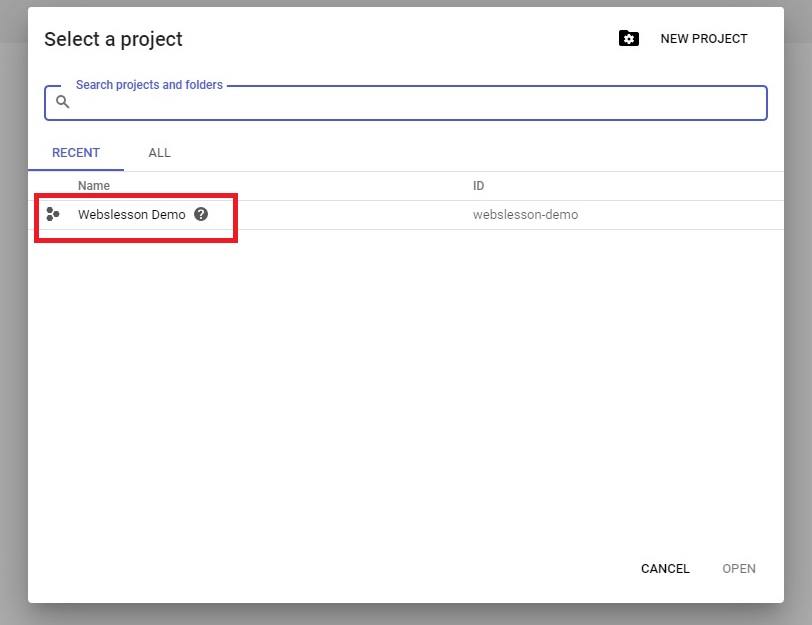
7 - After click on project select box, then one modal will popup and under this you can find list of project, so select your project.


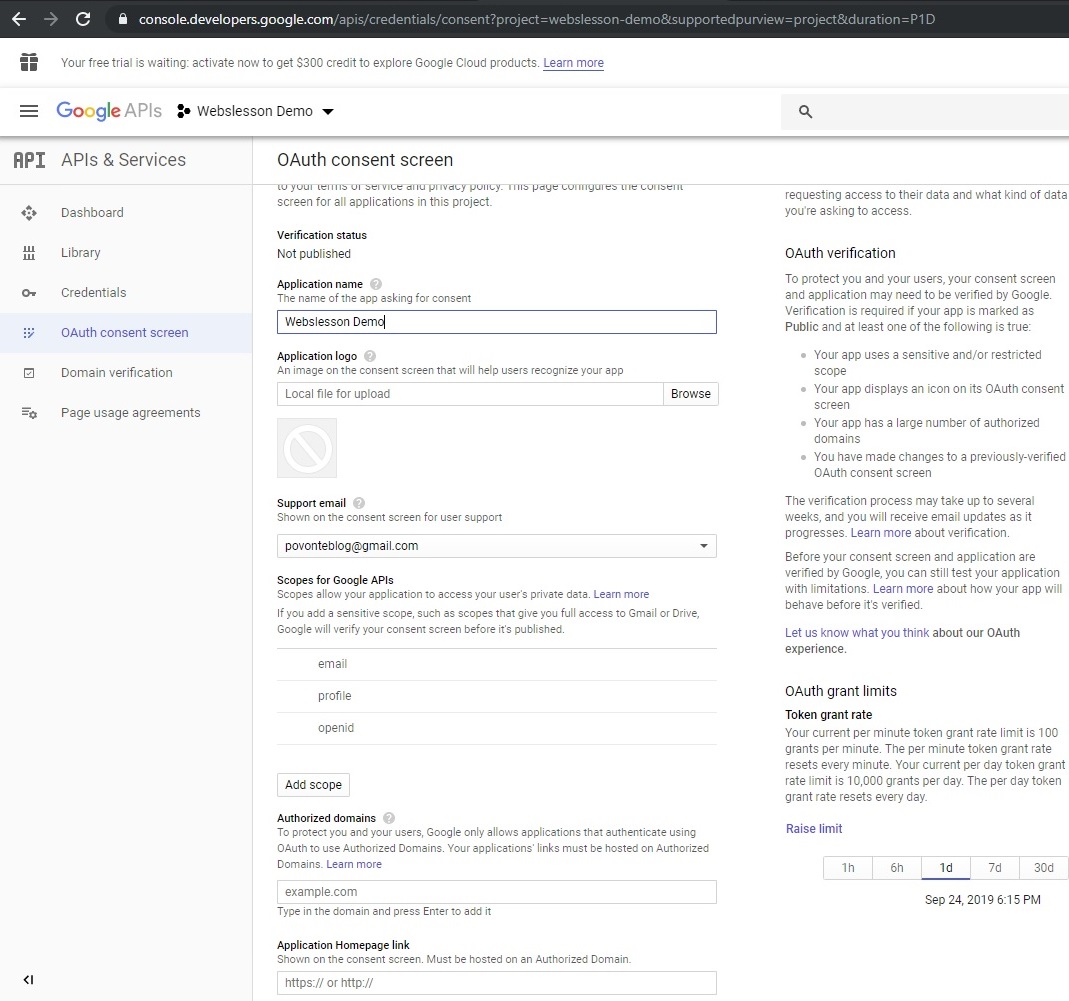
8 - Now from left menu, you have to click on OAuth consent screen.
9 - Once you have click on OAuth consent screen, then one page will load, here you have to define application name and after this click on save button.


10 - When you have click on save button, then after page will redirect another page, and here you have to click on Create credential button, so one drop down menu will appear and from this you have to select OAuth client ID.


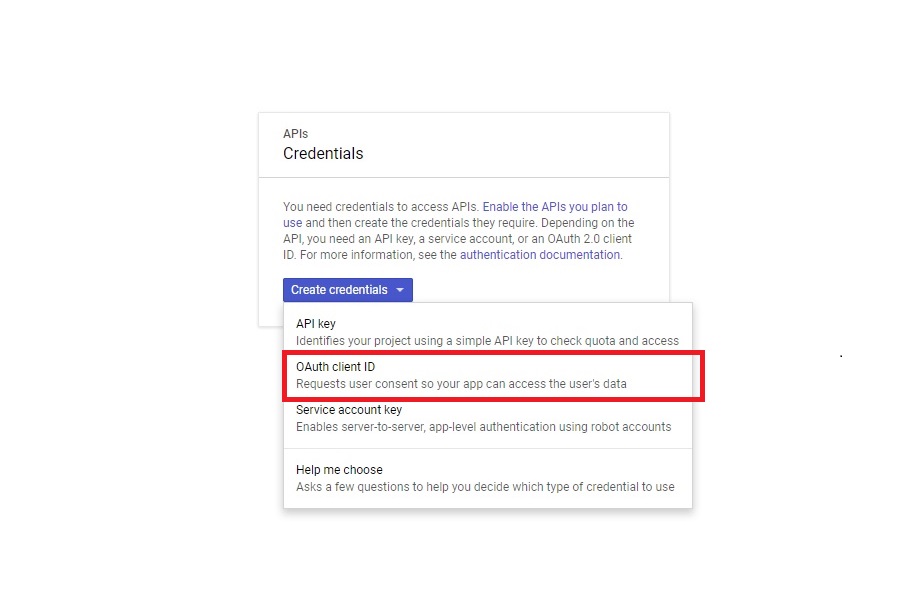
11 - After click on OAuth client ID menu then you have redirect to another page, and here you can find different Application type.


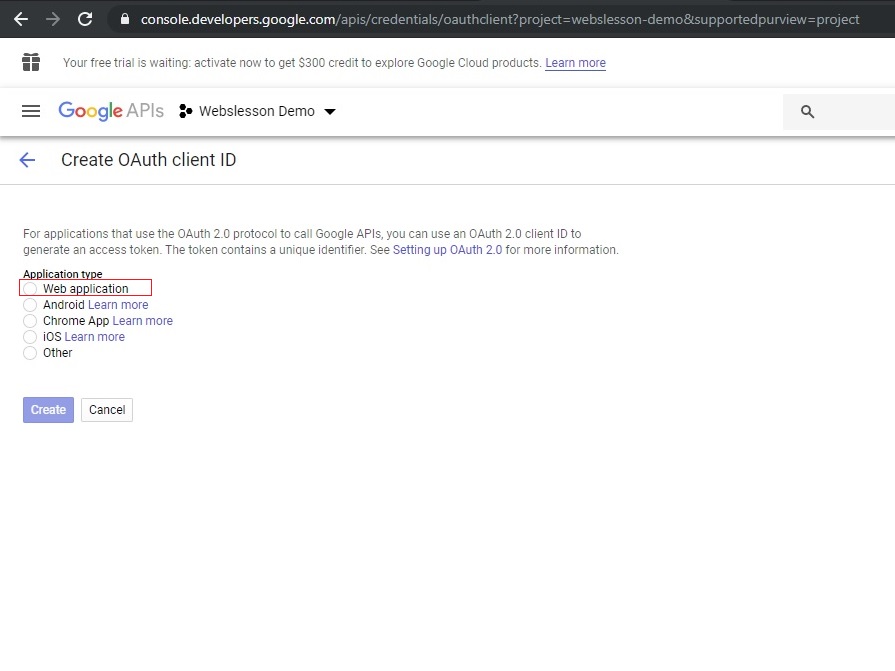
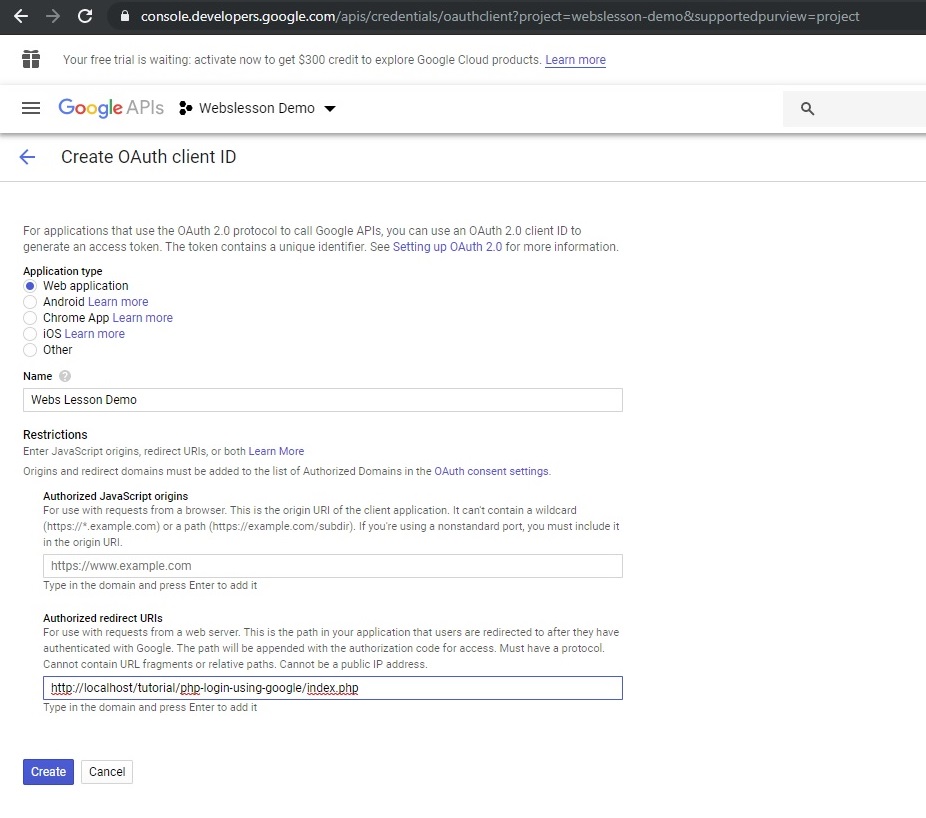
12 - From different Application type option, you have to select Web application. Once you have select Web application option, then one form will appear on web page. Here you have to define Name and you have also define Authorized redirect URIs field and lastly click on Create button.


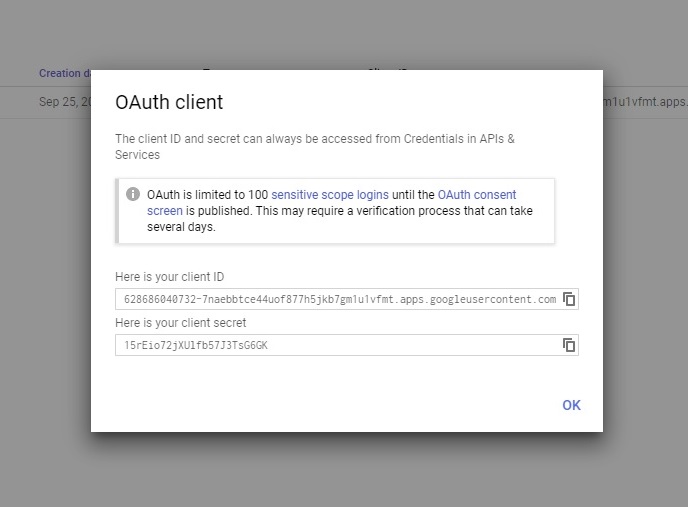
13 - Once you have click on create button, then you can get your Client ID and your client secret key. You have to copy both key for future use for implement Login using Google account using PHP.


Download Google API Client Library for PHP


After getting Google API key, now we need to download Google API Client Library for PHP. For this we have to go command prompt and first type composer command, after this we need to run following command.


composer require google/apiclient:"^2.0"


This command will download Google API Client Library for PHP in your define directory. Now we have proceed for PHP code for how to use Google API Client Library for login using Google account with PHP.

config.php


<?php

//config.php

//Include Google Client Library for PHP autoload file
require_once 'vendor/autoload.php';

//Make object of Google API Client for call Google API
$google_client = new Google_Client();

//Set the OAuth 2.0 Client ID
$google_client->setClientId('1034286712318-kv0gapfqro1aijq84ed72r4aqqs8nan8.apps.googleusercontent.com');

//Set the OAuth 2.0 Client Secret key
$google_client->setClientSecret('Dzq5Xd3olizoZkKjk_SJCWQ1');

//Set the OAuth 2.0 Redirect URI
$google_client->setRedirectUri('http://localhost/tutorial/php-login-using-google-demo/index.php');

//
$google_client->addScope('email');

$google_client->addScope('profile');

//start session on web page
session_start();

?>


index.php


<?php

//index.php

//Include Configuration File
include('config.php');

$login_button = '';

//This $_GET["code"] variable value received after user has login into their Google Account redirct to PHP script then this variable value has been received
if(isset($_GET["code"]))
{
 //It will Attempt to exchange a code for an valid authentication token.
 $token = $google_client->fetchAccessTokenWithAuthCode($_GET["code"]);

 //This condition will check there is any error occur during geting authentication token. If there is no any error occur then it will execute if block of code/
 if(!isset($token['error']))
 {
  //Set the access token used for requests
  $google_client->setAccessToken($token['access_token']);

  //Store "access_token" value in $_SESSION variable for future use.
  $_SESSION['access_token'] = $token['access_token'];

  //Create Object of Google Service OAuth 2 class
  $google_service = new Google_Service_Oauth2($google_client);

  //Get user profile data from google
  $data = $google_service->userinfo->get();

  //Below you can find Get profile data and store into $_SESSION variable
  if(!empty($data['given_name']))
  {
   $_SESSION['user_first_name'] = $data['given_name'];
  }

  if(!empty($data['family_name']))
  {
   $_SESSION['user_last_name'] = $data['family_name'];
  }

  if(!empty($data['email']))
  {
   $_SESSION['user_email_address'] = $data['email'];
  }

  if(!empty($data['gender']))
  {
   $_SESSION['user_gender'] = $data['gender'];
  }

  if(!empty($data['picture']))
  {
   $_SESSION['user_image'] = $data['picture'];
  }
 }
}

//This is for check user has login into system by using Google account, if User not login into system then it will execute if block of code and make code for display Login link for Login using Google account.
if(!isset($_SESSION['access_token']))
{
 //Create a URL to obtain user authorization
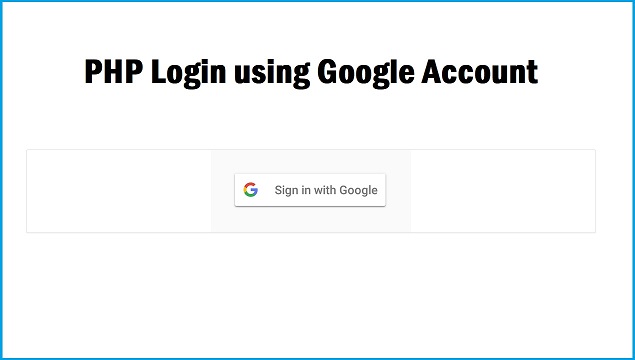
 $login_button = '<a href="'.$google_client->createAuthUrl().'"><img src="sign-in-with-google.png" /></a>';
}

?>
<html>
 <head>
  <meta http-equiv="Content-Type" content="text/html; charset=utf-8" />
  <title>PHP Login using Google Account</title>
  <meta content='width=device-width, initial-scale=1, maximum-scale=1' name='viewport'/>
  <script src="https://ajax.googleapis.com/ajax/libs/jquery/2.1.3/jquery.min.js"></script>
  <script src="https://maxcdn.bootstrapcdn.com/bootstrap/3.3.6/js/bootstrap.min.js"></script>
  <link href="https://maxcdn.bootstrapcdn.com/bootstrap/3.3.6/css/bootstrap.min.css" rel="stylesheet" />
  
 </head>
 <body>
  <div class="container">
   <br />
   <h2 align="center">PHP Login using Google Account</h2>
   <br />
   <div class="panel panel-default">
   <?php
   if($login_button == '')
   {
    echo '<div class="panel-heading">Welcome User</div><div class="panel-body">';
    echo '<img src="'.$_SESSION["user_image"].'" class="img-responsive img-circle img-thumbnail" />';
    echo '<h3><b>Name :</b> '.$_SESSION['user_first_name'].' '.$_SESSION['user_last_name'].'</h3>';
    echo '<h3><b>Email :</b> '.$_SESSION['user_email_address'].'</h3>';
    echo '<h3><a href="logout.php">Logout</h3></div>';
   }
   else
   {
    echo '<div align="center">'.$login_button . '</div>';
   }
   ?>
   </div>
  </div>
 </body>
</html>


logout.php


<?php

//logout.php

include('config.php');

//Reset OAuth access token
$google_client->revokeToken();

//Destroy entire session data.
session_destroy();

//redirect page to index.php
header('location:index.php');

?>


So, this is complete process for How to use Google API Client library for PHP Login by using Google account.

Sunday, 22 September 2019

How to Create Progress Bar for Data Insert in PHP using Ajax


We all know how to insert data using PHP with Ajax but if you know how to increment a progress bar while insert data into mysql database in php using Ajax with jQuery and Bootstrap. There are many viewers reader of our blog has requested us to publish post on How to display data inserting process on progress bar with PHP using Ajax jQuery and Bootstrap.

First we want to know why we have use progress bar in web development. There are many different ways we have use progress bar in our web application. e.g For display file downloading process we have use progress bar. For display file uploading process we have use progress bar in our web page. And event for any form data submission process like inserting of data or updating of data process we can also display progress bar. So, user can understand their data has been process. So, this way we have use progress bar in our web development.

Now we have come to our topic like how to create process bar while inserting of data using PHP with Ajax. This is one type of feature which will increase your website user interface. Because it has define processing of data on web page using progress bar element.

In below example, we have define how to make progress bar by using jQuery Bootstrap with Ajax and PHP. Here we have use PHP script for server side processing of data and for client side we have use Ajax jQuery and Bootstrap. Ajax has been used for send data to server, jQuery has been used for form data validation and continue execution of function and lastly bootstrap has been used for make progress bar. Now when user has filled form and all data successfully validated then it will send data to server using Ajax, when data has insert into mysql database table, then at that time it will display inserting of data in progress bar, so it will increase website UI. So, this way we can display insert data process in progress bar in PHP with Ajax, jQuery and Bootstrap. Below you can find complete source with online demo also.


Source Code


Database


--
-- Database: `testing`
--

-- --------------------------------------------------------

--
-- Table structure for table `tbl_sample`
--

CREATE TABLE `tbl_sample` (
  `id` int(11) NOT NULL,
  `first_name` varchar(250) NOT NULL,
  `last_name` varchar(250) NOT NULL
) ENGINE=MyISAM DEFAULT CHARSET=latin1;

--
-- Indexes for table `tbl_sample`
--
ALTER TABLE `tbl_sample`
  ADD PRIMARY KEY (`id`);

--
-- AUTO_INCREMENT for dumped tables
--

--
-- AUTO_INCREMENT for table `tbl_sample`
--
ALTER TABLE `tbl_sample`
  MODIFY `id` int(11) NOT NULL AUTO_INCREMENT, AUTO_INCREMENT=1;


index.php


<?php

//index.php

?>

<!DOCTYPE html>
<html>
 <head>
  <title>How to Create Progress Bar for Data Insert in PHP using Ajax</title>  
  <script src="https://ajax.googleapis.com/ajax/libs/jquery/3.1.0/jquery.min.js"></script>
  <link rel="stylesheet" href="https://maxcdn.bootstrapcdn.com/bootstrap/3.3.6/css/bootstrap.min.css" />
  <script src="https://maxcdn.bootstrapcdn.com/bootstrap/3.3.7/js/bootstrap.min.js"></script>
 </head>
 <body>
  
  <br />
  <br />
  <div class="container">
   <h1 align="center">How to Create Progress Bar for Data Insert in PHP using Ajax</h1>
   <br />
   <div class="panel panel-default">
    <div class="panel-heading">
     <h3 class="panel-title">Enter Data</h3>
    </div>
      <div class="panel-body">
       <span id="success_message"></span>
       <form method="post" id="sample_form">
        <div class="form-group">
         <label>First Name</label>
         <input type="text" name="first_name" id="first_name" class="form-control" />
         <span id="first_name_error" class="text-danger"></span>
        </div>
        <div class="form-group">
         <label>Last Name</label>
         <input type="text" name="last_name" id="last_name" class="form-control" />
         <span id="last_name_error" class="text-danger"></span>
        </div>
        <div class="form-group" align="center">
         <input type="submit" name="save" id="save" class="btn btn-info" value="Save" />
        </div>
       </form>
       <div class="form-group" id="process" style="display:none;">
        <div class="progress">
       <div class="progress-bar progress-bar-striped active" role="progressbar" aria-valuemin="0" aria-valuemax="100" style="">
       </div>
      </div>
       </div>
      </div>
     </div>
  </div>
 </body>
</html>

<script>
 
 $(document).ready(function(){
  
  $('#sample_form').on('submit', function(event){
   event.preventDefault();
   var count_error = 0;

   if($('#first_name').val() == '')
   {
    $('#first_name_error').text('First Name is required');
    count_error++;
   }
   else
   {
    $('#first_name_error').text('');
   }

   if($('#last_name').val() == '')
   {
    $('#last_name_error').text('Last Name is required');
    count_error++;
   }
   else
   {
    $('#last_name_error').text('');
   }

   if(count_error == 0)
   {
    $.ajax({
     url:"process.php",
     method:"POST",
     data:$(this).serialize(),
     beforeSend:function()
     {
      $('#save').attr('disabled', 'disabled');
      $('#process').css('display', 'block');
     },
     success:function(data)
     {
      var percentage = 0;

      var timer = setInterval(function(){
       percentage = percentage + 20;
       progress_bar_process(percentage, timer);
      }, 1000);
     }
    })
   }
   else
   {
    return false;
   }
  });

  function progress_bar_process(percentage, timer)
  {
   $('.progress-bar').css('width', percentage + '%');
   if(percentage > 100)
   {
    clearInterval(timer);
    $('#sample_form')[0].reset();
    $('#process').css('display', 'none');
    $('.progress-bar').css('width', '0%');
    $('#save').attr('disabled', false);
    $('#success_message').html("<div class='alert alert-success'>Data Saved</div>");
    setTimeout(function(){
     $('#success_message').html('');
    }, 5000);
   }
  }

 });
</script>


process.php


<?php

//process.php

$connect = new PDO("mysql:host=localhost; dbname=testing", "root", "");

if(isset($_POST["first_name"]))
{
 $data = array(
  ':first_name'  => trim($_POST["first_name"]),
  ':last_name'  => trim($_POST["last_name"])
 );

 $query = "
 INSERT INTO tbl_sample 
 (first_name, last_name) 
 VALUES (:first_name, :last_name)
 ";

 $statement = $connect->prepare($query);

 $statement->execute($data);

 echo 'done';
 
}

?>


Web Security Best Practices for PHP


Cyber crime has been on the increase for decades now, hence the need to ensure that your PHP code is totally secure. There are best practices that are recommended for programmers who want to protect their code from malicious attacks. Some of the important tips and tricks are enumerated in this article to ensure that your application is less vulnerable and without performance issues.

#1 Validate Input Data


There is a lot to do while writing PHP code to ensure that your web application is not easily exploited by certain users. Proper data validation will ensure that your application is protected from the activities of hackers and spammers who have illegitimate motives.

Client-side or server-side validation could be used to guard against problems that come with bad input from a user. Data validation with JavaScript which happens on the client-side is a lot faster with fewer traffic calls. The downside is that it is dependent on the browser, and disabling JavaScript will make your application vulnerable.

Server-side validation, on the other hand, is a lot slower due to several traffic calls, but cannot be manipulated by spammers. Have you ever tried to pick a username while creating a new social media account and got a response stating that it is already taken? That is server-side validation at work.

Validating all forms of data regardless of its source using both techniques is key to ensuring that your app works in the best way possible.

#2 Prevent Cross-Site Scripting (XSS)


Cross-site scripting (XSS) occurs when a user injects code into a web page to bypass certain restrictions. The code which is usually in JavaScript eventually runs on the server and can expose sensitive data of other users.

Web application vulnerabilities like XSS makes it possible for code from untrusted sources to be executed in the victim's browser as a result of poor data validation. Filtering all entries and eliminating special character with functions like stripslashes(), htmlspecialchars(), and trim(). Eliminating tags that would make the malicious code valid ensures that users are not redirected to a different server, keeping their private data protected.


#3 Routine PHP Updates


PHP updates come with security fixes which ensures that your web applications are not easily compromised. Endeavor to update all your sites to the latest PHP version to ensure that there are no bugs and other vulnerability issues.

Running older versions of PHP will have you using deprecated functions which are no longer supported, causing your site to malfunction. These functions are interpreted wrongly, thereby opening loopholes for the exploitation of your code by attackers.

There are a couple of tools that can be used to check for deprecation in your code so that you do not have to update the entire code. PHP Analyzer (Phan) and PHP 7 Migration Assistant Report (MAR) are some powerful tools that check your code line by line for compatibility issues.

#4 Eliminate Session Hijacking Risks


While using a web application, core data is collected during the session which should be stored in a secure location. It is usually saved to a file and is not very efficient as hackers can easily access the entire information contained therein.

Although encrypting session data could work but is not entirely efficient. Storing your data on a database is recommended, ensuring that it is totally safe and easily accessible from different machines. The session_set_save_handler() function lets you control the way that the session data is stored.

#5 Limit File Access


PHP projects feature several files that contain important data which are relevant to the web application. The fact that some of these files do not bear the “.php” extension means that they would not be parsed even when called directly.

However, files that contain sensitive application data should be kept in directories that are not accessible to the end-users. These PHP include files should also be saved in ".php" extension to ensure that everything works perfectly.

Conclusion


Developers all over the world are in a race against time to fix security loopholes in their applications to avoid malicious attacks that could victimize end users. There are several other strategies to ensure that your PHP applications are impenetrable even for skilled hackers. Hence, you need to keep developing yourself as hackers are getting better as well.


Author

Author Bio:

Cynthia Young loves taking every opportunity to share her knowledge with others. Along with digital marketing, Cynthia is also passionate about personal growth and wellness. When she isn’t writing, she can be found hiking with her dog, cooking Thai cuisine, and enjoying hi-tech thrillers. She also frequently writes articles on the company The Word Point translation service.


Monday, 16 September 2019

Add or Remove Dynamic Dependent Select Box using jQuery with PHP Ajax

Part - 1


Part - 2


Part - 3


This is one more post on Add or Remove Input field, but now here we will discuss, how to Add or Remove Dynamic Dependent Select Box input field by using jQuery and How to insert Multiple input field data into Mysql table by using PHP with Ajax. Dynamic Dependent Select box or Drop down list box means child select box data must be depend on the value of select in parent select box. When we have change the value of parent select box then child select box data will be automatically change.

In some of our previous tutorial, we have already discuss how to Add or remove text box input field using jQuery with Ajax and PHP and we have also seen how to add or remove dynamic select box input field data using jQuery Ajax and PHP. But now question arise how to insert multiple form data with field like dynamic dependent select box. For this type of data we have to use add or remove input field using jQuery.

Currently, we have seen in PHP web development, in many event in which we want to insert multiple data into mysql database. Then at that time we would to require add or remove input fields concept. This feature has been used mainly used for multiple data insert into mysql table. But suppose in multiple data, we want to process dynamic dependent select box data, then at that time one question arise can we solve the problem of processing of multiple dynamic dependent select box data with add or remove input field concept. Below you can find complete source code for add or remove dynamic dependent select box using jquery and insert multiple input fields data using ajax with php.


Source Code


Mysql Table Stucture


--
-- Database: `testing`
--

-- --------------------------------------------------------

--
-- Table structure for table `tbl_category`
--

CREATE TABLE `tbl_category` (
  `category_id` int(11) NOT NULL,
  `category_name` varchar(200) NOT NULL,
  `parent_category_id` int(11) NOT NULL
) ENGINE=InnoDB DEFAULT CHARSET=latin1;

--
-- Dumping data for table `tbl_category`
--

INSERT INTO `tbl_category` (`category_id`, `category_name`, `parent_category_id`) VALUES
(2, 'Chemicals', 0),
(3, 'Inorganic chemicals', 2),
(4, 'Organic Chemicals', 2),
(5, 'Electronics', 0),
(6, 'Laptop', 5),
(7, 'Dell', 6),
(8, 'i3 Processor', 7),
(9, 'i5 Processors', 7),
(10, 'i7 Processors', 7),
(11, 'Epoxy', 2),
(12, 'Fine Chemicals', 2),
(13, 'Mobile', 5),
(14, 'Sensors', 5),
(15, 'Food', 0),
(16, 'Textile', 0),
(17, 'Fruits', 15),
(18, 'Vegetables', 15),
(19, 'Safety Shoes', 16),
(20, 'Uniform', 16);

--
-- Indexes for dumped tables
--

--
-- Indexes for table `tbl_category`
--
ALTER TABLE `tbl_category`
  ADD PRIMARY KEY (`category_id`);

--
-- AUTO_INCREMENT for dumped tables
--

--
-- AUTO_INCREMENT for table `tbl_category`
--
ALTER TABLE `tbl_category`
  MODIFY `category_id` int(11) NOT NULL AUTO_INCREMENT, AUTO_INCREMENT=21;

-------

--
-- Table structure for table `items`
--

CREATE TABLE `items` (
  `item_id` int(11) NOT NULL,
  `item_name` varchar(250) NOT NULL,
  `item_category_id` int(11) NOT NULL,
  `item_sub_category_id` int(11) NOT NULL
) ENGINE=InnoDB DEFAULT CHARSET=latin1;

--
-- Indexes for table `items`
--
ALTER TABLE `items`
  ADD PRIMARY KEY (`item_id`);

--
-- AUTO_INCREMENT for dumped tables
--

--
-- AUTO_INCREMENT for table `items`
--
ALTER TABLE `items`
  MODIFY `item_id` int(11) NOT NULL AUTO_INCREMENT, AUTO_INCREMENT=10;


database_connection.php


<?php

//database_connection.php

$connect = new PDO("mysql:host=localhost; dbname=testing;", "root", "");

function fill_select_box($connect, $category_id)
{
 $query = "
  SELECT * FROM tbl_category 
  WHERE parent_category_id = '".$category_id."'
 ";

 $statement = $connect->prepare($query);

 $statement->execute();

 $result = $statement->fetchAll();

 $output = '';

 foreach($result as $row)
 {
  $output .= '<option value="'.$row["category_id"].'">'.$row["category_name"].'</option>';
 }

 return $output;
}

?>


index.php


<?php

//index.php

include('database_connection.php');

?>

<!DOCTYPE html>
<html>
  <head>
    <title>Add Remove Dynamic Dependent Select Box using Ajax jQuery with PHP</title>
    <script src="https://ajax.googleapis.com/ajax/libs/jquery/3.1.0/jquery.min.js"></script>
    <link rel="stylesheet" href="https://maxcdn.bootstrapcdn.com/bootstrap/3.3.6/css/bootstrap.min.css" />
    <script src="https://maxcdn.bootstrapcdn.com/bootstrap/3.3.7/js/bootstrap.min.js"></script>
  </head>
  <body>
    <br />
    <div class="container">
      <h3 align="center">Add Remove Dynamic Dependent Select Box using Ajax jQuery with PHP</h3>
      <br />
      <h4 align="center">Enter Item Details</h4>
      <br />
      <form method="post" id="insert_form">
        <div class="table-repsonsive">
          <span id="error"></span>
          <table class="table table-bordered" id="item_table">
            <thead>
              <tr>
                <th>Enter Item Name</th>
                <th>Category</th>
                <th>Sub Category</th>
                <th><button type="button" name="add" class="btn btn-success btn-xs add"><span class="glyphicon glyphicon-plus"></span></button></th>
              </tr>
            </thead>
            <tbody></tbody>
          </table>
          <div align="center">
            <input type="submit" name="submit" class="btn btn-info" value="Insert" />
          </div>
        </div>
      </form>
    </div>
  </body>
</html>
<script>
    $(document).ready(function(){
      
      var count = 0;

      $(document).on('click', '.add', function(){
        count++;
        var html = '';
        html += '<tr>';
        html += '<td><input type="text" name="item_name[]" class="form-control item_name" /></td>';
        html += '<td><select name="item_category[]" class="form-control item_category" data-sub_category_id="'+count+'"><option value="">Select Category</option><?php echo fill_select_box($connect, "0"); ?></select></td>';
        html += '<td><select name="item_sub_category[]" class="form-control item_sub_category" id="item_sub_category'+count+'"><option value="">Select Sub Category</option></select></td>';
        html += '<td><button type="button" name="remove" class="btn btn-danger btn-xs remove"><span class="glyphicon glyphicon-minus"></span></button></td>';
        $('tbody').append(html);
      });

      $(document).on('click', '.remove', function(){
        $(this).closest('tr').remove();
      });

      $(document).on('change', '.item_category', function(){
        var category_id = $(this).val();
        var sub_category_id = $(this).data('sub_category_id');
        $.ajax({
          url:"fill_sub_category.php",
          method:"POST",
          data:{category_id:category_id},
          success:function(data)
          {
            var html = '<option value="">Select Sub Category</option>';
            html += data;
            $('#item_sub_category'+sub_category_id).html(html);
          }
        })
      });

      $('#insert_form').on('submit', function(event){
        event.preventDefault();
        var error = '';
        $('.item_name').each(function(){
          var count = 1;
          if($(this).val() == '')
          {
            error += '<p>Enter Item name at '+count+' Row</p>';
            return false;
          }
          count = count + 1;
        });

        $('.item_category').each(function(){
          var count = 1;

          if($(this).val() == '')
          {
            error += '<p>Select Item Category at '+count+' row</p>';
            return false;
          }

          count = count + 1;

        });

        $('.item_sub_category').each(function(){

          var count = 1;

          if($(this).val() == '')
          {
            error += '<p>Select Item Sub category '+count+' Row</p> ';
            return false;
          }

          count = count + 1;

        });

        var form_data = $(this).serialize();

        if(error == '')
        {
          $.ajax({
            url:"insert.php",
            method:"POST",
            data:form_data,
            success:function(data)
            {
              if(data == 'ok')
              {
                $('#item_table').find('tr:gt(0)').remove();
                $('#error').html('<div class="alert alert-success">Item Details Saved</div>');
              }
            }
          });
        }
        else
        {
          $('#error').html('<div class="alert alert-danger">'+error+'</div>');
        }

      });
      
    });
</script>


fill_sub_category.php


<?php

//fill_sub_category.php

include('database_connection.php');

echo fill_select_box($connect, $_POST["category_id"]);

?>


insert.php


<?php

//insert.php;

if(isset($_POST["item_name"]))
{
 include('database_connection.php');

 for($count = 0; $count < count($_POST["item_name"]); $count++)
 {
  $data = array(
   ':item_name'   => $_POST["item_name"][$count],
   ':item_category_id'  => $_POST["item_category"][$count],
   ':item_sub_category_id' => $_POST["item_sub_category"][$count]
  );

  $query = "
   INSERT INTO items 
       (item_name, item_category_id, item_sub_category_id) 
       VALUES (:item_name, :item_category_id, :item_sub_category_id)
  ";

  $statement = $connect->prepare($query);

  $statement->execute($data);
 }

 echo 'ok';
}


?>


Wednesday, 11 September 2019

PHP Form with Google reCaptcha


If you not know how to add Google reCaptcha in PHP form, then you have come on right place. Because in this post you can find solution of How to integrate Google reCaptcha in PHP form and here you can also find how to validate PHP form with Google reCaptcha by using Ajax jQuery.

Form data has been validate with Google reCaptcha is required because we all know spamming is one of very common problem which has been faced on web. Every Website owner prevent their website from invalid spam traffic or spam comment.

Before programmer has used random captcha code for prevent spamming or bots filled in their website form. But this is old method and now most of the web application has been used Google reCAPTCHA, for verify that form input field has been filled by any human. Google reCAPTCHA is very simple to verify that he is user. User can verify just in single click for that they are not a robot.

Below you can find step by step guide for How to build PHP spam free form by using Google reCaptcha.


Step 1: Get Google reCaptcha API Key


For get Google reCaptcha API key, you first have Google account. If you have google account, then login into your Google account and visit this website https://www.google.com/recaptcha/admin.


Once you have visit above link then, you can see above image web page. Here you have to define label name, domain name in which you want to integrate Google reCaptcha and click on submit button. Here we want to use in localhost also so we have include localhost in domain list also. And lastly click on submit button, then you can get API key, which you can see below.


Add Google reCaptcha API key in your web page


In this tutorial, we will create our HTML form in index.php file. So, in this file first we need to add reCAPTCHA javascript library in our HTML code.


<script src="https://www.google.com/recaptcha/api.js" async defer></script>


After this we want to add following HTML code for generate Google reCAPTCHA widget in form.


<div class="g-recaptcha" data-sitekey="6Ldv2bcUAAAAAFeYuQAQWH7I_BVv2_2_fedg2Fpp"></div>


Here in data-sitekey value, we have to add site key which we have get from Google reCAPTCHA api key. Once you have add this code and refresh web page then Google reCaptcha widget will be created in your web page. Below you can source code of index.php file


index.php

<html>  
    <head>  
        <title>How to Implement Google reCaptcha in PHP Form</title>  
  <link rel="stylesheet" href="//code.jquery.com/ui/1.12.1/themes/base/jquery-ui.css">
        <link rel="stylesheet" href="https://maxcdn.bootstrapcdn.com/bootstrap/3.3.7/css/bootstrap.min.css">
  <script src="https://code.jquery.com/jquery-1.12.4.js"></script>
    <script src="https://code.jquery.com/ui/1.12.1/jquery-ui.js"></script>
    <script src="https://www.google.com/recaptcha/api.js" async defer></script>
    </head>  
    <body>  
        <div class="container" style="width: 600px">
   <br />
   
   <h3 align="center">How to Implement Google reCaptcha in PHP Form</a></h3><br />
   <br />
   <div class="panel panel-default">
      <div class="panel-heading">Register Form</div>
    <div class="panel-body">
     
     <form metod="post" id="captcha_form">
      <div class="form-group">
       <div class="row">
        <div class="col-md-6">
         <label>First Name <span class="text-danger">*</span></label>
         <input type="text" name="first_name" id="first_name" class="form-control" />
         <span id="first_name_error" class="text-danger"></span>
        </div>
        <div class="col-md-6">
         <label>Last Name <span class="text-danger">*</span></label>
         <input type="text" name="last_name" id="last_name" class="form-control" />
         <span id="last_name_error" class="text-danger"></span>
        </div>
       </div>
      </div>
      <div class="form-group">
       <label>Email Address <span class="text-danger">*</span></label>
       <input type="text" name="email" id="email" class="form-control" />
       <span id="email_error" class="text-danger"></span>
      </div>
      <div class="form-group">
       <label>Password <span class="text-danger">*</span></label>
       <input type="password" name="password" id="password" class="form-control" />
       <span id="password_error" class="text-danger"></span>
      </div>
      <div class="form-group">
       <div class="g-recaptcha" data-sitekey="6Ldv2bcUAAAAAFeYuQAQWH7I_BVv2_2_vvmn2Fpp"></div>
       <span id="captcha_error" class="text-danger"></span>
      </div>
      <div class="form-group">
       <input type="submit" name="register" id="register" class="btn btn-info" value="Register" />
      </div>
     </form>
     
    </div>
   </div>
  </div>
    </body>  
</html>

<script>
$(document).ready(function(){

 $('#captcha_form').on('submit', function(event){
  event.preventDefault();
  $.ajax({
   url:"process_data.php",
   method:"POST",
   data:$(this).serialize(),
   dataType:"json",
   beforeSend:function()
   {
    $('#register').attr('disabled','disabled');
   },
   success:function(data)
   {
    $('#register').attr('disabled', false);
    if(data.success)
    {
     $('#captcha_form')[0].reset();
     $('#first_name_error').text('');
     $('#last_name_error').text('');
     $('#email_error').text('');
     $('#password_error').text('');
     $('#captcha_error').text('');
     grecaptcha.reset();
     alert('Form Successfully validated');
    }
    else
    {
     $('#first_name_error').text(data.first_name_error);
     $('#last_name_error').text(data.last_name_error);
     $('#email_error').text(data.email_error);
     $('#password_error').text(data.password_error);
     $('#captcha_error').text(data.captcha_error);
    }
   }
  })
 });

});
</script>


Validate User Response at Server side


After this we need to validate user response at server side, for this we have to process_data.php file, in which recaptcha response data will be received using Ajax. When user submit form, then reCAPTCHA widget response has been received at process_data.php using Ajax. Here we need to verify response by following php script.


if(empty($_POST['g-recaptcha-response']))
 {
  $captcha_error = 'Captcha is required';
 }
 else
 {
  $secret_key = '6Ldv2bcUAAAAAFXUKdLW_qljFd9FpxNguf06DHhp';

  $response = file_get_contents('https://www.google.com/recaptcha/api/siteverify?secret='.$secret_key.'&response='.$_POST['g-recaptcha-response']);

  $response_data = json_decode($response);

  if(!$response_data->success)
  {
   $captcha_error = 'Captcha verification failed';
  }
 }


Here in secret key variable, we need to define secret key which we have get from Google reCaptcha website. Here you need to define your secret key which you have get at the time of generating Google reCAPTCHA API key.

For validate user response here we have send request to Google reCaptcha API url for check user response is proper or not using file_get_contents() function. Below you can find complete PHP script for validate form data with Google recaptcha response also.

process_data.php


<?php

//process_data.php

if(isset($_POST["first_name"]))
{
 $first_name = '';
 $last_name = '';
 $email = '';
 $password = '';

 $first_name_error = '';
 $last_name_error = '';
 $email_error = '';
 $password_error = '';
 $captcha_error = '';

 if(empty($_POST["first_name"]))
 {
  $first_name_error = 'First name is required';
 }
 else
 {
  $first_name = $_POST["first_name"];
 }

 if(empty($_POST["last_name"]))
 {
  $last_name_error = 'Last name is required';
 }
 else
 {
  $last_name = $_POST["last_name"];
 }
 if(empty($_POST["email"]))
 {
  $email_error = 'Email is required';
 }
 else
 {
  if(!filter_var($_POST["email"], FILTER_VALIDATE_EMAIL))
  {
   $email_error = 'Invalid Email';
  }
  else
  {
   $email = $_POST["email"];
  }
 }

 if(empty($_POST["password"]))
 {
  $password_error = 'Password is required';
 }
 else
 {
  $password = $_POST["password"];
 }

 if(empty($_POST['g-recaptcha-response']))
 {
  $captcha_error = 'Captcha is required';
 }
 else
 {
  $secret_key = '6Ldv2bcUAAAAAFXUKdLW_qljFd9FpxNguf06DHhp';

  $response = file_get_contents('https://www.google.com/recaptcha/api/siteverify?secret='.$secret_key.'&response='.$_POST['g-recaptcha-response']);

  $response_data = json_decode($response);

  if(!$response_data->success)
  {
   $captcha_error = 'Captcha verification failed';
  }
 }

 if($first_name_error == '' && $last_name_error == '' && $email_error == '' && $password_error == '' && $captcha_error == '')
 {
  $data = array(
   'success'  => true
  );
 }
 else
 {
  $data = array(
   'first_name_error' => $first_name_error,
   'last_name_error' => $last_name_error,
   'email_error'  => $email_error,
   'password_error' => $password_error,
   'captcha_error'  => $captcha_error
  );
 }

 echo json_encode($data);
}

?>


So, this was the complete step by step process for using Google reCaptcha with PHP and validate response using Ajax with PHP. We hope you can understan how to integrate Google reCAPTCHA checkbox using PHP.

Saturday, 7 September 2019

Make Captcha Script in PHP with Ajax


This post will explain you, how to make your own custom captcha in PHP using jQuery and Ajax in HTML form.

Do you know what is captcha. In web development, Captcha is one random generated alpha numeric captcha string, and it is stored in session variable for validate it with the captcha code enter by the user at the time of filling of form field.

Captacha is for prevent the bot or spammer for filling form field automatically. Because Captcha code has been display in an image, which can be only human can able to read it.

When we have allow public user to enter data into our website, then we need to identify that data has been enter by human. Because currently, many people has use robots to fill form data, so many unwanted data has been entered into website. So it will increase lots of load on our website, which will be down for sometime.

So, Captcha is one type of methods which helps website owner to prevent robots or bots from inserting of data. There are different type of Captcha like text-based, audio based or image based we can implement our web page, and it will generate random code dynamically. In form filling captcha code will be mandatory, without filling code user cannot submit form, so robot cannot read image text and robot will not submit form with data.

In this post, we will use PHP script for image with dynamic alpha numeric string and make graphics based captcha code. Here Captcha code will be stored under PHP $_SESSION variable for future use.And for validate user has enter correct captcha code, for this we will use jQuery and Ajax.


Source Code


index.php


<?php

//index.php

?>

<html>  
    <head>  
        <title>How to implement Custom Captcha Code in PHP</title>  
  <link rel="stylesheet" href="//code.jquery.com/ui/1.12.1/themes/base/jquery-ui.css">
        <link rel="stylesheet" href="https://maxcdn.bootstrapcdn.com/bootstrap/3.3.7/css/bootstrap.min.css">
  <script src="https://code.jquery.com/jquery-1.12.4.js"></script>
    <script src="https://code.jquery.com/ui/1.12.1/jquery-ui.js"></script>
    </head>  
    <body>  
        <div class="container" style="width: 600px">
   <br />
   
   <h3 align="center">How to implement Custom Captcha Code in PHP</a></h3><br />
   <br />
   <div class="panel panel-default">
      <div class="panel-heading">Register Form</div>
    <div class="panel-body">
     <form method="post" id="captch_form">
      <div class="form-group">
       <div class="row">
        <div class="col-md-6">
         <label>First Name</label>
         <input type="text" name="first_name" id="first_name" class="form-control" />
        </div>
        <div class="col-md-6">
         <label>Last Name</label>
         <input type="text" name="last_name" id="last_name" class="form-control" />
        </div>
       </div>
      </div>
      <div class="form-group">
       <label>Email Address</label>
       <input type="text" name="email" id="email" class="form-control" />
      </div>
      <div class="form-group">
       <label>Password</label>
       <input type="password" name="password" id="password" class="form-control" />
      </div>
      <div class="form-group">
       <div class="form-group">
                          <label>Code</label>
                          <div class="input-group">
                           <input type="text" name="captcha_code" id="captcha_code" class="form-control" />
                           <span class="input-group-addon" style="padding:0">
          <img src="image.php" id="captcha_image" />
         </span>
                          </div>
                         </div>
      </div>
      <div class="form-group">
       <input type="submit" name="register" id="register" class="btn btn-info" value="Register" />
      </div>
     </form>
    </div>
   </div>
  </div>
    </body>  
</html>


<script>
 $(document).ready(function(){
  
  $('#captch_form').on('submit', function(event){
   event.preventDefault();
   if($('#captcha_code').val() == '')
   {
    alert('Enter Captcha Code');
    $('#register').attr('disabled', 'disabled');
    return false;
   }
   else
   {
    alert('Form has been validate with Captcha Code');
    $('#captch_form')[0].reset();
    $('#captcha_image').attr('src', 'image.php');
   }
  });

  $('#captcha_code').on('blur', function(){
   var code = $('#captcha_code').val();
   
   if(code == '')
   {
    alert('Enter Captcha Code');
    $('#register').attr('disabled', 'disabled');
   }
   else
   {
    $.ajax({
     url:"check_code.php",
     method:"POST",
     data:{code:code},
     success:function(data)
     {
      if(data == 'success')
      {
       $('#register').attr('disabled', false);
      }
      else
      {
       $('#register').attr('disabled', 'disabled');
       alert('Invalid Code');
      }
     }
    });
   }
  });

 });
</script>


image.php


<?php

//image.php

session_start();

$random_alpha = md5(rand());

$captcha_code = substr($random_alpha, 0, 6);

$_SESSION['captcha_code'] = $captcha_code;

header('Content-Type: image/png');

$image = imagecreatetruecolor(200, 38);

$background_color = imagecolorallocate($image, 231, 100, 18);

$text_color = imagecolorallocate($image, 255, 255, 255);

imagefilledrectangle($image, 0, 0, 200, 38, $background_color);

$font = dirname(__FILE__) . '/arial.ttf';

imagettftext($image, 20, 0, 60, 28, $text_color, $font, $captcha_code);

imagepng($image);

imagedestroy($image);

?>


check_code.php


<?php

//check_code.php

session_start();

$code = $_POST['code'];

if($code == $_SESSION['captcha_code'])
{
 echo 'success';
}

?>


Tuesday, 3 September 2019

How to Upload and Resize Image in Laravel 5.8


If you are looking for tutorial on Resize Image before upload in Laravel 5.8 framework. So, you have come on the right place, because in this Laravel 5.8 image upload tutorial, in which we have step by step describe how to resize image in Laravel 5.8 framework at the time of uploading image. In Laravel 5.8 framework for resize image here we will use Intervention Image package for resize image at the time of uploading of an Image.

Resize image is very useful feature in any web based application, suppose in your web application if you have profile module and in this module you want to display profile image, then if you have display full size image then it will require more bandwidth for load image, but if you have load small thumbnail type image, then it will load fast. You can generate thumbnail image at the time of uploading of image by resize or cropping of image, you can generate thumbnail image and store in folder.

There are lots reader of our tutorial has requested us to publish web tutorial on how to resize image in Laravel 5.8 application. In Web development image resize is a required feature for use image as per size of the web page container. By Image resize it will help us to improve our loading of web page speed. In this post, we have decided to show how can we resize image in Laravel 5.8 by using intervention image library. By using this Intervention Library, we can easy to resize image at the time of uploading. Because this library has use PHP GD library and Imagegick for image resize and crop. Below you can find process for Resize image in Laravel 5.8.

  • Download and Install Laravel 5.8 framework
  • Download and Install Intervention Image Library
  • Make Controller in Laravel 5.8
  • Make View Blade File in Laravel 5.8
  • Set Route in Laravel 5.8
  • Run Laravel 5.8 Application


Download and Install Laravel 5.8 framework


For make application in Laravel 5.8 framework, first we need to download Laravel 5.8 framework and install in our local computer. For this we have go command prompt, in which first we need to run "composer" command, and go to directory in which we want to download and install laravel 5.8 framework. After this run following command.


composer create-project --prefer-dist laravel/laravel image_resize


This command will make image_resize folder in define directory, and in this folder it will download laravel 5.8 framework.

Download and Install Intervention Image Library


For resize image in Laravel 5.8 framework. For this here we have use Intervention Image package. Now we want download and install in Laravel 5.8 framework. For this we have to write following command, this command will download Intervention Image package in Laravel 5.8 framework for resize image at the time of uploading of image.


Make Controller in Laravel 5.8


In Laravel 5.8 application, for handle http request here we have to make controller. For make controller in Laravel 5.8 framework, first we need the system in which composer has been installed and then after go to your project root directory and run following command.


php artisan make:controller ResizeController


This command will make ResizeController.php controller class file in app/Http/Controllers folder.

In this controller class first we need to import intervention image library, for in this file first we need to write use Image; statement. By using this statement, we can import intervention image library in this controller class.

In this controller class we have make following method.

index() - This is the root method of this controller. This method has been load resize.blade.php file in browser.

resize_image(Request $request) - This method has been received request for image upload.
In this method first it has validate form data by using Laravel validator.
After this, it has make new name for image file. After making new name, first it has resize image by using intervention image library and upload resize image in thumbnail folder.
Once resize or crop image has been save into public directory thumbnail folder. Then after it has process for upload original size image in public directory images folder. After uploading and resize image, it will redirect url to it's previous location with data like success message and new image name.


<?php

namespace App\Http\Controllers;

use Illuminate\Http\Request;

use App\Http\Requests;

use Image;

class ResizeController extends Controller
{
    function index()
    {
     return view('resize');
    }

    function resize_image(Request $request)
    {
     $this->validate($request, [
      'image'  => 'required|image|mimes:jpeg,png,jpg,gif,svg|max:2048'
     ]);

     $image = $request->file('image');

     $image_name = time() . '.' . $image->getClientOriginalExtension();

     $destinationPath = public_path('/thumbnail');

     $resize_image = Image::make($image->getRealPath());

     $resize_image->resize(150, 150, function($constraint){
      $constraint->aspectRatio();
     })->save($destinationPath . '/' . $image_name);

     $destinationPath = public_path('/images');

     $image->move($destinationPath, $image_name);

     return back()
       ->with('success', 'Image Upload successful')
       ->with('imageName', $image_name);

    }
}


Make View Blade File in Laravel 5.8


View blade file in Laravel has been use for display html data on web page. In Laravel view file has been store in resources/views folder and here we have store resize.blade.php file. In this file we have make html form for uploading image. And by using Laravel expression, here it will display success or validation error and it will also display uploaded and resize image on web page after uploading of image.


<html>
 <head>
  <meta name="viewport" content="width=device-width, initial-scale=1">
  <title>Laravel 5.8 - Image Upload and Resize</title>
  <script src="https://ajax.googleapis.com/ajax/libs/jquery/2.2.0/jquery.min.js"></script>
  <link rel="stylesheet" href="https://maxcdn.bootstrapcdn.com/bootstrap/3.3.6/css/bootstrap.min.css" />
  <script src="https://maxcdn.bootstrapcdn.com/bootstrap/3.3.6/js/bootstrap.min.js"></script>
 </head>
 <body>
  <div class="container">
   <br />
   <h1 align="center">Laravel 5.8 - Image Upload and Resize</h1>
   <br />   
   <form method="post" action="{{ url('resize/resize_image') }}" enctype="multipart/form-data">
    @CSRF
    <div class="row">
           <div class="col-md-4" align="right">
            <h3>Select Image</h3>
           </div>
           <div class="col-md-4">
            <br />
               <input type="file" name="image" class="image" />
           </div>
           <div class="col-md-2">
            <br />
               <button type="submit" class="btn btn-success">Upload Image</button>
           </div>
       </div>
   </form>
   <br />
   @if(count($errors) > 0)
    <div class="alert alert-danger">
           <ul>
           @foreach($errors->all() as $error)
            <li>{{ $error }}</li>
           @endforeach
           </ul>
       </div>
   @endif

   @if($message = Session::get('success'))
   <div class="alert alert-success alert-block">
       <button type="button" class="close" data-dismiss="alert">×</button>    
       <strong>{{ $message }}</strong>
   </div>
   <div class="row">
       <div class="col-md-6">
           <strong>Original Image:</strong>
           <br/>
           <img src="/images/{{ Session::get('imageName') }}" class="img-responsive img-thumbnail">
       </div>
       <div class="col-md-4">
           <strong>Thumbnail Image:</strong>
           <br/>
           <img src="/thumbnail/{{ Session::get('imageName') }}" class="img-thumbnail" />
       </div>
   </div>
   @endif
  </div>
 </body>
</html>


Set Route in Laravel 5.8


Once your all code is ready, lastly we have to set the route of Controller method. For this we have to go routes/web.php file, and in this file we have to define the root of controller method.


Route::get('resize', 'ResizeController@index');

Route::post('resize/resize_image', 'ResizeController@resize_image');


Run Laravel 5.8 Application


Now we have to check output in browser. For this we have to again go to command prompt and write following command.


php artisan serve


This command will start Laravel server and it will give you http://127.0.0.1:8000 this base url of your Laravel application. For check above code you have to hit following url.


http://127.0.0.1:8000/resize


By hit above URL you can upload image and check image has been properly resize or not. So from this post you can learn something new lesson like resize image with upload in Laravel 5.8 framework.